Customer Guides (Public)
- Syncing a SharePoint Site To Your Computer
- Adding an Exchange Email account to the iPhone default mail app
- Options for Handling a Departing Employee's Mailbox
- Exporting Email Items to a PST in Outlook
- What to Do If Your Email Has Been Hacked: A Practical Guide
- Installing the Office 365 Applications
Syncing a SharePoint Site To Your Computer
What you will need:
- A link to the relevant SharePoint site(s) by a Globe2 support member.
- You may require your username and password to access or set-up OneDrive/SharePoint.
The steps:
- You will be provided a link by Globe2 which will take you to that SharePoint's documents. Please click on this and if promtped sign in.
- When you reach the 'Shared Documents' page, please click the sync button
 to sync the SharePoint drive/documents to your computer.
- You may be prompted to open/install OneDrive, please click yes and follow any steps provided.
- Once complete, your SharePoint documents will be added within your file explorer and will look similar to the below:

Adding an Exchange Email account to the iPhone default mail app
-
Open the settings app on your phone and find mail
-
Click Mail accounts, then add account
-
Select "Microsoft Exchange"
-
Enter the Email address here, and add something to the description box (I use "Work Email" for the description for example)
-
Click "Sign in" (Make sure not to click configure manually)
-
You may get a pop up saying something along the lines of "Settings wants to Use microsoftonline.com to sign in", make sure to press continue here
-
It will load the microsoft login page, sign in with your email and password here
-
You can then select what you want to sync (mail, contacts, calendars etc) and click Save
Options for Handling a Departing Employee's Mailbox
When an Employee Leaves: What You Can Do
If an employee has left, you have a few options regarding their mailbox. Here’s what to consider:
1. Keep the Mailbox Active
- You can continue the mailbox as a separate entity.
- If the mailbox is still under contract, you may need to keep it until the contract ends.
- Email forwarding can be set up to redirect emails to another employee.
2. Convert the Mailbox to a Shared Mailbox (Free Option)
- If the contract has ended, you can convert the mailbox to a shared mailbox at no cost.
- Shared mailboxes allow multiple users to access old emails, but no new emails can be sent from them unless a license is applied.
3. Cancel the Mailbox License
- If the mailbox is out of contract, you can cancel the license and remove the mailbox.
- Data Retention Warning: If no backup service is in place, all data in the mailbox will be lost when the license is removed.
- See details: Globe2 Service Cancellation Policy.
4. Review Other Related Services
- Did the employee have access to SharePoint, OneDrive, or a company CRM? These may need to be restricted or reassigned.
What’s Next?
- Contact Globe2 Support at support@globe2.net or call 03333 446 441 to discuss your preferred option.
- If you need email forwarding or account conversion, we can arrange that for you.
Exporting Email Items to a PST in Outlook
Note: Exporting and importing a mailbox using a .pst file isn't supported in new Outlook at this time.
If you're already using new Outlook, you'll need turn off the New Outlook toggle and switch back to classic Outlook.
Before you begin
Before you start your export, there's a few things you should do to make sure your export goes smoothly.
- Do a mailbox cleanup: i.e delete junk email before beginning.
-
By default, Outlook is set to download email for the past 1 year. If you want to export all your emails, please ensure you open Outlook, select Account settings > Account Name and Sync Settings and move the slider to All. After changing this slider, please allow an hour for all emails to be downloaded before continuing.

A video of the below guide can be found on the Microsoft website.
Begin exporting email, contacts, and calendar items from Outlook to a .pst file
-
At the top of the ribbon in classic Outlook, choose File.

-
Choose Open & Export > Import/Export.
-
Choose Export to a file > Next.
-
Click Outlook Data File (.pst) > Next.
-
Select the name of the email account to export, as shown in the picture below. Only information for one account can be exported at a time.
Make sure that the Include subfolders check box is selected. This ensures that everything in the account will be exported: Inbox, Calendar, Contacts, and Tasks. Choose Next.

-
Click Browse to select where to save the Outlook Data File (.pst). Enter a file name, and choose OK to continue.
Note: If you’ve used export before, the previous folder location and file name appear. Type a different file name before choosing OK.
-
If you are exporting to an existing Outlook Data File (.pst), under Options, specify what to do when exporting items that already exist in the file.
-
Choose Finish.
-
Outlook begins the export immediately unless a new Outlook Data File (.pst) is created or a password-protected file is used.
-
If you’re creating an Outlook Data File (.pst), an optional password can help protect the file. When the Create Outlook Data File dialog box appears, enter the password in the Password and Verify Password boxes, and choose OK. In the Outlook Data File Password dialog box, enter the password, and choose OK.
-
If you’re exporting to an existing Outlook Data File (.pst) that is password protected, in the Outlook Data File Password dialog box, enter the password, then choose OK.
-
What to Do If Your Email Has Been Hacked: A Practical Guide
Email is the digital front door to your business – and if it gets compromised, the consequences can ripple far beyond your inbox.
This guide explains the practical steps you need to take immediately, and how to prevent future attacks.
Step 1: Regain Control – Immediately
Change Your Password
Change your password immediately. Choose a strong, unique password that you haven’t used elsewhere. Don’t just add a “1” to the end – go for a passphrase or use a password manager to generate something truly secure.
Contact us straight away – we can force a reset and help you regain access securely.
Locked Out? Take Action
If you’ve been locked out of your account or notice suspicious logins (e.g. sign-ins from unusual locations), act fast:
- Contact us
- Request an account reset and block further access if possible.
We can review Microsoft sign-in activity, force sign-outs, and apply conditional access to block further intrusion.
Step 2: Improve Your Security
Turn on Two-Factor Authentication (2FA)
This is the single biggest improvement you can make. 2FA means even if someone steals your password, they can’t log in without access to your phone or authentication app. If you’re using Microsoft 365, this should be turned on as standard - if it’s not, we strongly recommend enabling it.
Use a Unique, Strong Password
One of the most common mistakes is reusing the same password across multiple accounts. If hackers get access to one, they often try it elsewhere — a method known as “credential stuffing.”
Use a password manager (like Keeper) to generate and store unique, strong passwords for each service.
Consider Additional Security Features
Advanced Email Threat Protection can block phishing and malware at source.
Step 3: Consider the Wider Impact
Was This Password Used Elsewhere?
If the same password was used on other services (e.g. LinkedIn, Dropbox, even Netflix), change those passwords too. Email accounts are often the gateway to resetting other logins – so this matters.
Check for Malware or Keyloggers
If a hacker gained access using a password that you’re certain was private, it’s possible your device is compromised. Run a full malware and antivirus scan, and consider:
Reinstalling a clean version of your operating system (if the compromise is severe)
Checking for persistent threats like keyloggers or remote access tools
Conclusion
Getting hacked can be stressful, but how you respond matters more. Taking swift action and improving your security setup can prevent far worse consequences including data theft, reputational damage, or unauthorised financial access.
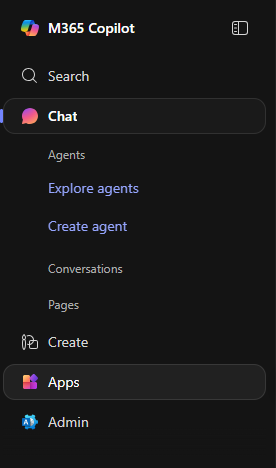
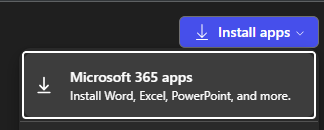
Installing the Office 365 Applications
- Visit https://portal.office.com/ in your Web Browser of Choice (Google Chrome, Safari, Firefox etc)
- Log in using your Microsoft 365 account details
- Click "Apps" in the menu on the left hand side

- Click the "Install Apps" button in the top right

- Select "Microsoft 365 Apps" from the list that appears

- After the apps are installed, open one of them. You will then be prompted to sign in with your account details to Activate Office