Customer Guides (Public)
- Webex Download Instructions & Guides
- Webex Desktop User Guide
- Webex Mobile User Guide
- Go Integrator and Click to Call Set-up
- iCall Suite - Call Analytics
- User License Comparison
- Pausing / Resuming Call Recording (Public)
- Call Barge In Guide (Public)
- Accessing and download calls from the call recording portal
- Yealink Wifi Set-up
- Pairing an additional Yealink Handset to the W70B
- How to create/edit group contacts via the business portal
- How to record voice prompts for the phone system
- How to block calls to/from a specific number
- How to reset the application password for a user? (Used for GoInt & Webex)
Webex Download Instructions & Guides
Webex is a softphone application that will allow you to make or receive calls using an application your mobile or computer using your work number.
Downloading the application:
First, you will need to download the relevant application for your device using the link below:
https://bwks-uap.webex.com/download?partner-org-uuid=5343abe8-231b-4094-b7db-c19df2b6a3f6&config-set-uuid=72f95b9d-13a1-4384-9abd-7d7edddc4867&show-message=false
When you first open the application, please click sign in. You will then be prompted to enter your username and password. Please enter the details supplied by Globe2.
Getting Started Guides:
Webex Desktop User Guide
Getting Started:
Adding contacts:
- Webex, select the contacts icon
 from the left hand menu.
 - Next click the ‘create contact’ button.
- Then, click create a custom contact and then enter the relevant contact details.
- Then click save -> add.
Making a call
- In Webex, select the phone icon
 from the left hand menu.
 - From this screen, you can then enter the phone number and press enter to dial that number.
Alternatively, you can search for a contact and click on their name to dial them.
Transferring calls
- During a call, press the three dots
 and then click the transfer option.
 - A new pop-up will be shown. Dial the desire number or search for the contact and then press the consult now button / transfer now button to transfer the call.
a. Consult Now: Places the original call on hold, allowing you to speak with the recipient before completing the transfer. Once you have consulted with the recipient, you can then press the transfer button shown on screen to complete the transfer.
b. Transfer Now: Immediately transfers the call to the selected recipient without prior communication.
Webex Mobile User Guide
Getting Started:
Adding contacts:
- In Webex, select the phone icon
 from the bottom menu and then click contacts at the top of the screen.
 - Next click the ‘add a contact’ button.
- Then, click ‘customise a new contact’ and then enter the relevant contact details.
- Then click save -> add.
Making calls
- In Webex, select the phone icon from the bottom menu.
- From here, you can either select the then click on the dial icon
 and dial a number or press contacts at the top of the screen to select a contact.
Transferring calls
- During a call, press the three dots and then click the transfer option.
- A new pop-up will be shown. Dial the desired number or search for the contact and then press the consult now button / transfer now button to transfer the call.
a. Consult Now: Places the original call on hold, allowing you to speak with the recipient before completing the transfer. Once you have consulted with the recipient, you can then press the transfer button shown on screen to complete the transfer.
b. Transfer Now: Immediately transfers the call to the selected recipient without prior communication.
Go Integrator and Click to Call Set-up
Prerequisite: you will need your application username or password. If you are not sure what this is, you can ask Globe2 to reset this for you.
Instructions:
- First, please download and install/run the Go Integrator Cara application from the link below:
https://downloads.yourwhc.co.uk/dms/_goIntegrator/Carainstaller.exe - After installing the application, it will open and prompt you for your username and password. Please enter your username and password and click log in.
- Next in Chrome, visit the following link and install the extension. With this installed, you are able to click on the phone numbers and have it dial out on your phone.
https://chromewebstore.google.com/detail/telephone-number-detectio/oolkfddhhccdciigjigaghblnlkbgjki
iCall Suite - Call Analytics
iCall Suite - Call Analytics provides a business with a web-based reporting package that allows them to run and email reports on all aspects of calls made, attempted calls, received calls and missed calls. Likewise it enables this call data to be presented in live visual Wallboards for Call Centre operations.
The application portal comes with standard branding and cannot be branded.
iCS provides users with a mobile-optimised suite of call analytics that can be accessed via any web browser. There are 3 core modules available and only one can be used at a time, as you upgrade, you gain the functionality from the previous package.
- iCS Insight
- iCS Report
- iCS Report Premier
iCS Insight
iCS insight is a business productivity tool delivering powerful call data visualisation via a predefined dashboard and wallboard.
Intuitive dashboard
The at-a-glance dashboard monitors performance to visualise call activity such as:
- Hourly / daily call distribution
- Call activity by DDI / extension / user
- Missed call summary
- Unreturned missed calls by caller ID
Business wallboard
The pre-configured wallboard displays key business metrics (DDI, user and business summary).
iCS Report
iCS Report delivers enhanced-level call reporting and analytics. Access configurable dashboards, wallboards and detailed reporting. Run and schedule reports.
iCS Report features include:
- Schedule reports for ‘yesterday’, ‘last week’, ‘last month’ or custom dates.
- Browse an extensive catalogue of reports or use filters to customise your own. Report on call activity by extension, department, hunt group, DDI and user, including total calls, destination, talk time and ring time.
- Incoming call analytics measure call volumes, targets, grade of service, percentage calls answered, call abandoned, longest waiting and unreturned missed calls.
- Executive reports collate data from multiple reports, and provide observations & recommended actions.
- Customised dashboards and wallboards.
iCS Report Premier
iCS Report Premier enhances the functionality of iCS Report by adding live call statistics and monitors contact centre queues and agents. Monitor call activity via live dashboards, reports and wallboards for up to the minute contact centre analytics and granular reporting.
iCS Report Premier features include:
- Real time reporting; live calls waiting and call handling statistics by agent and ACD call queue. Report on total calls, destination, talk time, ring time, grade of service, percentage calls answered, number of calls in queue, call abandoned, longest waiting and unreturned missed calls.
- At a glance dashboards and wallboards display group performance parameters on a live tile.
- Live call statistics for queues and agents, such as number / duration of calls and availability.
- Supervisor management tools including agent presence monitoring.
- Review performance and use “what if” calculations to forward plan contact centre agent shifts.
User License Comparison
The below table only compares the user license features. The site features i.e hunt groups are the same.
|
|
Foundation License |
HV Select License |
|
Inclusive Minutes |
PAYG |
|
|
Voicemail |
|
|
|
Personal Contacts |
|
|
|
User Call Forwarding |
|
|
|
Do Not Disturb |
Not included |
|
|
Speed Dials |
Not included |
|
|
Busy Lamp Fields |
Not included |
|
|
User Selective Call Forwarding |
Not included |
|
|
Alternative/Additional Numbers** |
Not included |
|
|
Pre-ring Message (pre-alert) |
Not included |
|
* 5,000 Minutes Per User: Subject to fair usage. Inclusive UK Mobile networks: FM1, FM3, FM4, FM5 and FM6.
** Chargeable extra
Pausing / Resuming Call Recording (Public)
Please note: this feature must be enabled by Globe2 before use.
If enabled, individual users can pause and resume call recordings during a phone call and there are a few different ways to achieve this depending on the device you are using:
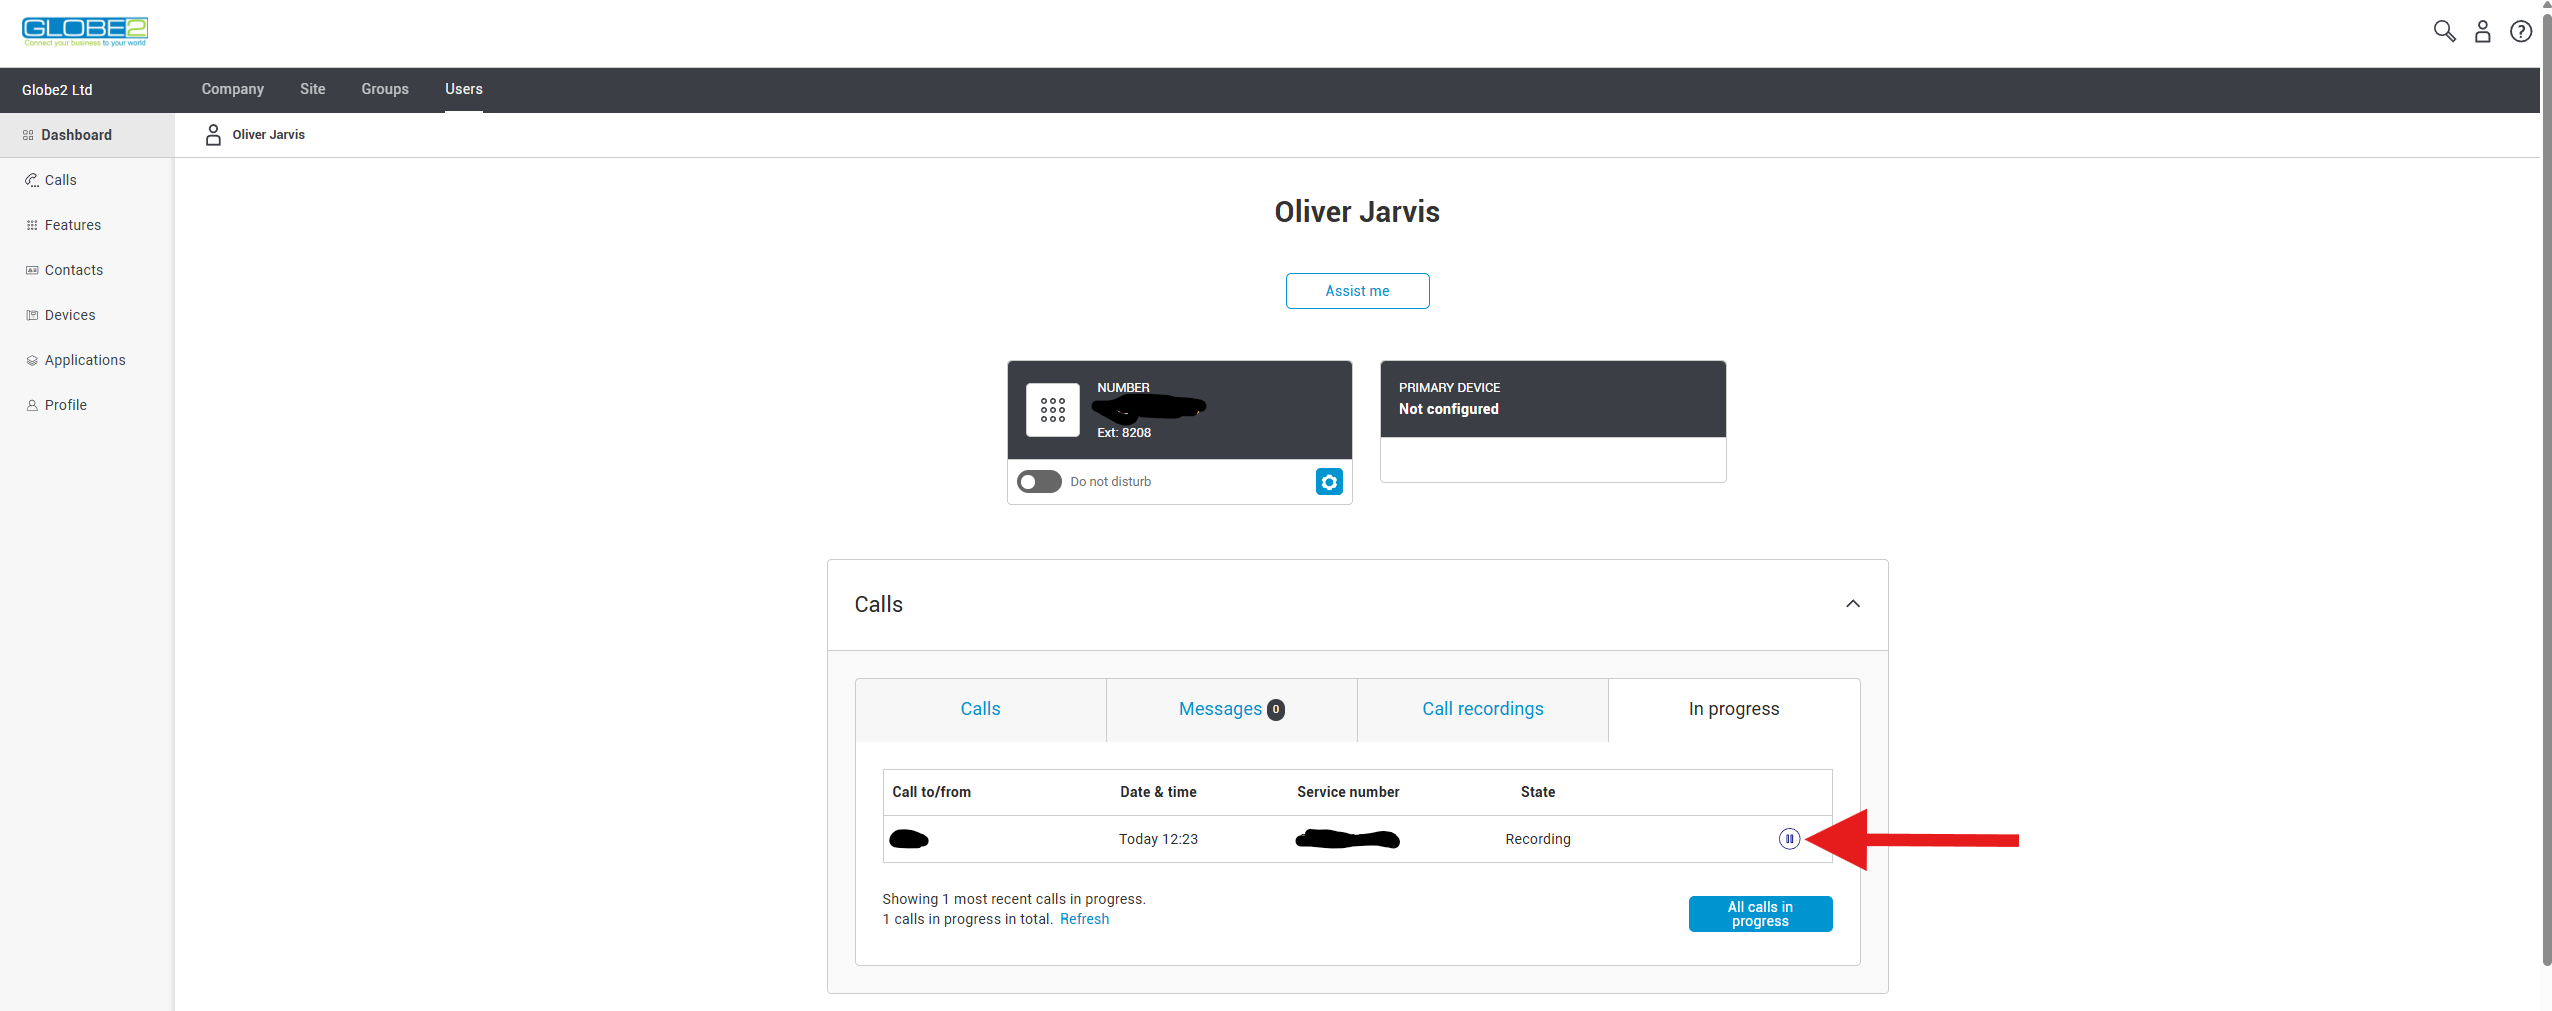
Via the portal (easiest):
If provided access, users can login to the "Business Portal", and pause/resume call recordings easily via the dashboard as shown in the example below:
Via a desk phone:
During a call users can pause recordings by placing the current call on hold and dialling *48 and resuming their current call. When required, users can then resume call recording by once again placing their current call on hold and dialling *49.
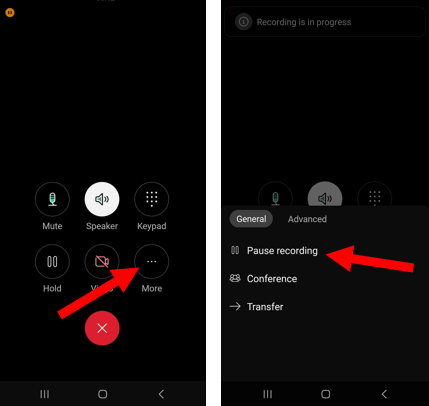
Via Webex (mobile):
Pausing/Resuming call recordings during a call via Webex is very straight forward and does not require placing the user on hold. During a call, simply click on the more button and select the pause recording option. To resume, click on the more button and click resume recording.
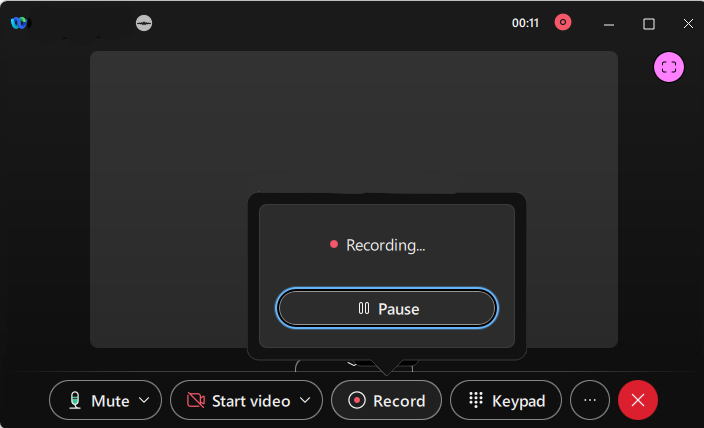
Via Webex (Desktop)
During a call, press the record button at the bottom of the Webex window, and then click pause. Repeat the same process to resume the recording afterwards.
Call Barge In Guide (Public)
What is call barge in?:
Call barge in allows users to barge in to talk to or listen in to another users
Please note: by default all users are exempt from having their calls barged in. To remove this exemption, please contact support@globe2.net. Furthermore, by default an audible tone will be played to the user who's call is being barged.
How to barge in a call:
While another user is on a call, dial *33 followed by their extension number. If you have the warning tone turned on in the Business Portal, the other user will hear it to make them aware Barge In has occurred. A three-way call will then be established.
Accessing and download calls from the call recording portal
Voice recording must be enabled for this to be possible
Who can access the call recording portal?
Both end users and company administrators can access the call recording portal, however end users can only see their own call recordings.
Accessing the Call Recording Portal
✅ For Administrators (Company, Site, or Group Admins):
-
Login to the Business Portal.
-
Click sites in the top menu
-
Click on the desired site, scroll down to the bottom
-
Click the Call recording button. This will open the Call Recording Portal in a new tab and automatically log in the user with admin privileges based on their role.
✅ For End Users:
-
Login to the Business Portal.
-
On the left-hand menu, select “Calls” under Dashboard.
-
Click the Call Recording button.
-
This opens the Call Recording Portal in a new tab, logging them in automatically with their appropriate permissions.
Downloading calls:
- From the left hand menu, select interactions and you will be shown a list of completed call recordings.
- Find the desired call and click the view details button (the right arrow)
- Click the download icon and select ".mp3" to download the call in mp3 format.
Yealink Wifi Set-up
If you’ve ordered a WiFi-enabled Yealink phone from us, this quick-start guide will walk you through setting up the WiFi connection.
Initial Setup (First-Time Use)
When you plug in the phone for the first time, you’ll be prompted to change the default password.
- Proceed with changing it — this is required.
- The password will later be updated automatically as part of our setup process.
- For simplicity, we recommend temporarily changing it to: 3333446441
- The default password is: admin
Connecting to WiFi
- On the phone, go to:
Menu → Settings → Basic Settings - Select WiFi, and make sure it is turned ON.
- Scroll down to Available Networks, then press Scan.
- After the scan completes, press Enter.
- Find your WiFi network and press Connect.
- When prompted, enter your WiFi password.
- Tip: Enable “Show Password” to see what you're typing.
Pairing an additional Yealink Handset to the W70B
1. Put the W70B base into registration mode
- Press and hold the paging / wireless button (the circular button with the Wi-Fi/phone icon) on the W70B for ~5 seconds until its registration LED (the phone icon) starts flashing. This means the base is in registration mode. It will time out automatically after about 90 seconds if no handset registers.
2. On the W73H handset — start registration
Press OK → Settings → Registration → Register Handset and select base 1 if prompted from the list.
3. Complete the pairing
- After selecting the base, the handset will search and attempt to register.
- When prompted, enter the registration PIN. The default PIN is usually 0000.
- Upon success, the handset will display “Handset Subscribed” (showing the base’s identifier) and initialize. Then it will show its internal handset number/name.
If you have multiple handsets sharing one account, you may need to configure the number assignment in the online GUI. Please contact support@globe2.net should you need further assistance.
How to create/edit group contacts via the business portal
Requires admin access to the business portal
If group contacts are not showing up, make sure Group contacts are enabled under Features > Phone Services
What are Group Contacts?
Group contacts are contacts that multiple users on the system have access to. They will show up in the phone Directory on the handset, and their name will display on the Caller ID when you receive an incoming call from them.
Adding a contact
- Log into the business portal using your admin account (portal.globe2.net)
- Navigate to Site (at the top) > Features (on the left) > And search for Group Contacts
- Click the Add Contact button
- Enter the Name and Phone number and click save
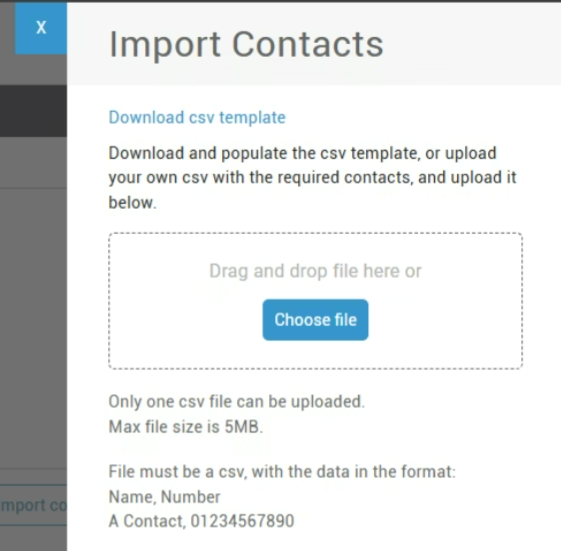
Importing Contacts
You can also Import Contacts by Clicking the "Import Contacts" button. You will need to update a CSV file here with the correct format (see screenshot below)
How to record voice prompts for the phone system
The phone system requires voice prompts or recordings to be in a WAV U-LAW format. You can easily record voice prompt messages using your smartphone.
Instructions:
Please download the relevant application from the below links, open the app and record your message. Please then send the recording to support@globe2.net and we can upload this for you.
iOS: https://apps.apple.com/gb/app/broadsoft-recorder/id635802005
Android: https://play.google.com/store/apps/details?id=com.yydigital.broadsoft.recorder&hl=en_GB
How to block calls to/from a specific number
You must be logged in as an administrator to make these changes
Instructions:
- Login to the Business Portal as a company administrator
- Then click on site in the top menu and then select features from the left hand menu
- Next, search for and click the cog icon next to the feature named calling rules
- Then click on digit strings from the left hand menu and click the add digit string button and enter the details as required -> save.
- Then, click digit plans from the left menu. From here, you can click the cog icon next to the digit string within the Outgoing / incoming digit string subpanel to block (restrict) calls to/from that number.
How to reset the application password for a user? (Used for GoInt & Webex)
The below instructions will guide you on updating the application password for a user. This is the password which is used for applications like Webex or Go Integrator.
The steps differ slightly depending on whether you are signing in as a company administrator or an end-user:
As a company admin:
- Sign in to the Business Portal
- When logged in click users from the top menu
- Next, click on the username of the user you would like to reset the password for
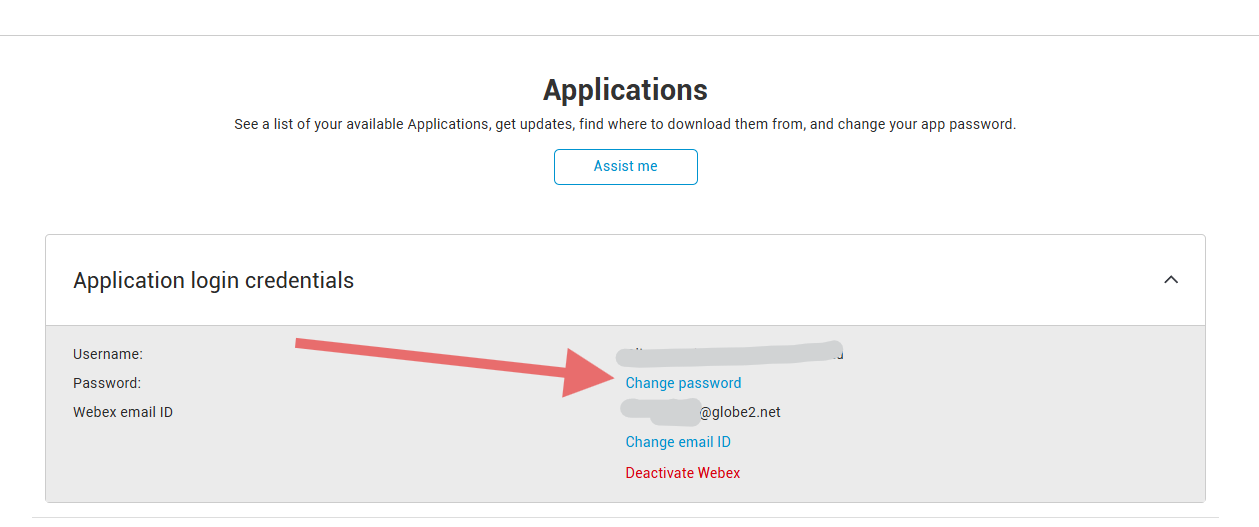
- Then, from the left-hand menu select applications and click change password as shown in the screenshot below.
- You will then be directed to a screen where you can set the password yourself.
As an end user:
- Sign in to the Business Portal
- From the left-hand menu, select applications
- Then click change password as shown in the below image.
- You will then be directed to a screen where you can set the password yourself.